Basic Tricks + Q&A
When diving into Phantom Dust online, there's some stuff you may see that's a bit confusing or less than obvious. Playing the campaign can answer a lot of these questions, but sometimes you may forget a detail, or just want to get to playing online ASAP.
Here's a checklist of some of the most useful things to know
index
- Nameplates
- Characters
- Lock-On Icon
- Tag Team Mode Revive
- Mulligan
- Falling Off The Stage
- Out Of Skills
- Quick Battle
- Shields
- Misc Damage
- Schools per Arsenal
- Physical Manual PDF
- In-Depth Guide
See Where Everyone Is - Toggle floating name displays
It's like you've figured this one out, but this is worth remembering: Pressing the RB button (default gamepad controls) () will toggle to show everyone's player name in white, which will appear wherever they are. This makes it way easier to tell where everyone is located without guesswork.
Yes, this is different from just seeing the name of the person you're locked on to - this is in addition to that. So remember to turn this function on!
Character Choice Matters - Your extra movement button is changed!
You may notice some characters can cartwheel around or roll while you can only jump. Or you can do one of those, but NOT jump. This depends on the character you pick when entering the game.
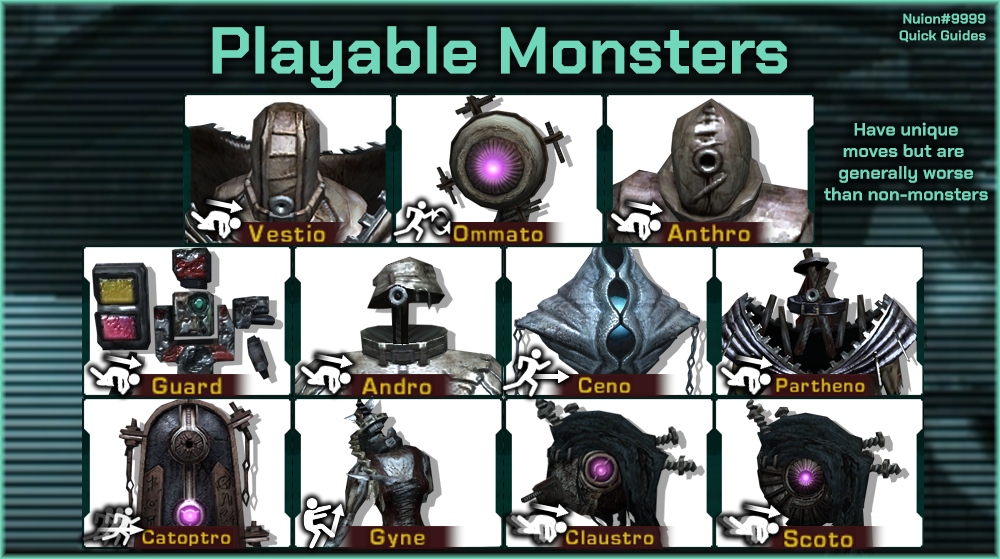
Note that you can press a button on the select screen (X default) to choose the monster characters.
General rule of thumb for the humans, jump characters are on the left, dodge characters are on the rightEspers
Jump - Freia, Player, Meister, Chunky, Know, Tsubutaki
Cartwheel - Egar, pH, Sammah
Tumble - Cuff Button, JD

Monsters
Jump - Gyne
Tumble - Vestio, Anthro, Guard, Andro, Partheno
Dive Forward - Ceno
Spin Forward, In Air - Onmato
Dash Forward + Phasing - Catoptro
Tumble Forward + Phasing - Claustro, Scoto

Lock-On Icon - Determine if your attacks will hit, and if your melee will move
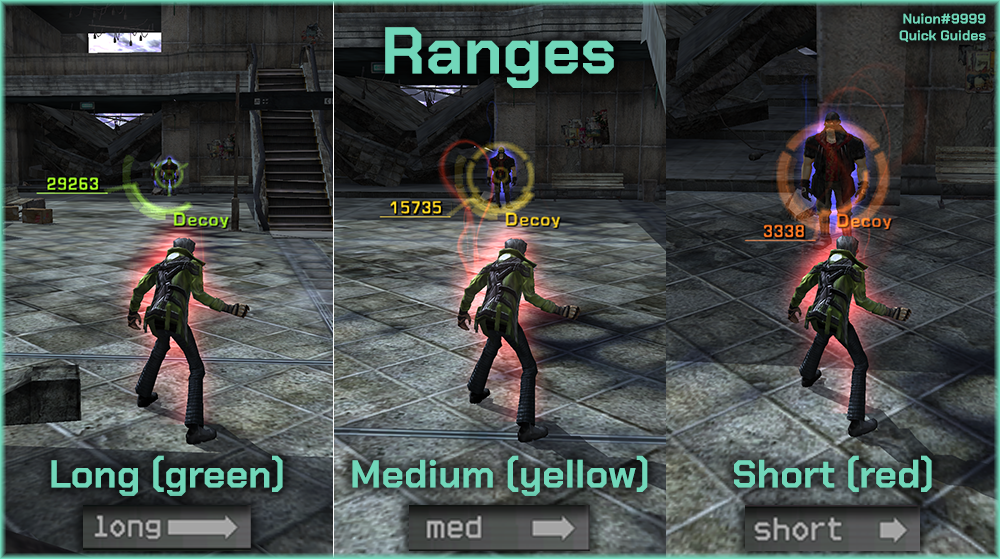
When using lock-on (RT on default gamepad), the icon that appears on enemies will change color depending on your distance from them. This helps you determine your relative range.
Green - Long range
Yellow - Medium range
Orange - Close range
This can help give you a rough idea if your attack is likely to hit or not - i.e., a long-range curving laser is more likely to hit from long range, and probably not at all from close range. But this is more of a rule of thumb rather than a guarantee (it's possible it could hit while the icon reads as medium).
Have you ever wondered why when doing a sword attack, sometimes you move, but sometimes you don't? This is because of your range. If, for instance, Flame Sword is used while the opponent is in medium range, you will stay still while swinging. If used while the icon reads close range, you will move while swinging.
Very good to know if you're trying to charge in with a sword and want it to hit!

Tag Team Mode - How do I revive my teammate?
When playing the team mode, you may see your opponent's teammate come back to life, while you can't for some reason. There's a specific way to revive a downed teammate:
1. Find their body, where they died
2. Press one of the face buttons (default gamepad) to "pick them up", just like you would absorb an orb (You can use any button, and yes, this can overwrite a skill)
3. Press that button again to then actually revive them
4. The teammate will revive at their spawn point. Their health will be 10 at first revival, 5 at the second, 3 at the third, etc.
Changing a Bad Starting Hand - Mulligan!
When starting a round, you will see your character at the starting point and a countdown until you can move. You will also be able to see your starting "hand" (skills plugged into your four face button slots) and see the starting three capsules.
During the countdown, you can press the "Menu" button (default gamepad - the Select or Back button on other controls). If you do, the four starting skills in your hand will be changed!
You can only do this once during the countdown. This is great if you want different skills or want more Aura Particles. Only the skills in your hand are changed, not the capsules at the starting point.
This is like how trading card games may allow for a "Mulligan", where if you don't like your opening hand, you reshuffle it and draw another.
Emergency Retreat - Respawning back at your start point by falling off the stage
You may soon discover that if you fall off the edge of a stage, you will lose 3 health and reappear at your spawn point. While taking damage sucks, you can use this strategically to escape from a bad situation or refill your hand with different skills.
It's worth keeping in mind that your opponent can also do this intentionally. Or, if you're in a position where you can use an attack that'll force them off the stage, remember how this could actually work out in their favor.
Why is my health draining? - The consequences of absorbing all your orbs
Starting out, you may try to just absorb and overwrite your orbs as fast as possible to try to get the perfect hand. But, you may want to be more careful: Once you have absorbed every possible orb available to you (30 total), no more will regenerate - but in addition to this, your health will start draning!
Why is my Arsenal random? - Quick Battle vs Standard Battle types
You may make your own custom Arsenal, hop online, and then find you can't actually use it, instead getting a bunch of random skills. This is because the lobby you're in has selected Quick Battle mode - this gives you one of 8 different random Arsenals.
To play games with your own Arsenals, join or create a lobby on Standard Battle mode. After you select your character, you will get to select your Arsenal.
Quick Battle allows you to get into games without having to set up an Arsenal or deal with other player's hand-crafted setups.
Where'd my shield go? - Defense breaking from STR vs DEF
You may have intuited the answer to this one, but it can be found by looking skill stats: If you use a shield to block an attack with a higher STR value than the shield's DEF, the defending shield skill will be deleted from your hand after use.
Example: An 8 STR attack can be blocked by a 5 DEF shield, but it will break and disappear from your hand.
Why'd I get tagged with extra damage? - Debris damage and fall damage
Sometimes you'll get hit by an attack, environmental elements will get destroyed, and you'll see you've taken extra damage. This is because destroyed debris can, at times, hurt you for additional damage. Examples include a bridge being broken over your head or some of the signs on the tilted buildings stage.
Normally, when falling from high up by jumping or walking off, you won't be hurt. But, if you are damaged in some way that causes you to fall, you will take additional damage when you hit the floor below. This does not display on the screen, but can be seen on your health bar.
This extra fall damage also occurs if you are flying by some method and get hit out of the air.
Why would I ever pick a 1 school Arsenal? - The difference between Arsenal cases
Your "Aura" is the number in the middle of your skill list in the corner, which allows you to use skills while you have to appropriate number. Aura regeneration describes how that number then goes back up with time.
There are three types of Arsenal cases: 1 school, 2 school, and 3 school. This limits what kind of skills you can add to your deck. You may wonder why you'd ever go for less than 3 once it's an option, but there's a reason for that: The case effects your Aura regeneration rate.
1 School Arsenal - Aura Regeneration Time: -30%
2 School Arsenal - Aura Regeneration Time: Standard rate
3 School Arsenal - Aura Regeneration Time: +30%
If you opt for more options, your Aura will take longer to regenerate. Less, and it will take less time. Picking 3 school is more tricky and dangerous than it seems.
Special Thanks
Algol (Phantom Dust Happy Hour Discord) - Fielding some of my dumb questions
Show (Phantom Dust Happy Hour Discord) - Reminding me of Mulligans
Guide written by CptKicksville - @CptKicksville
Physical Manual
Thanks to Jax#2656 for scanning the physical manual in good quality.
Download Phantom Dust Manual PDF (max resolution, 50MB)
Slightly Compressed Preview Below
"CTRL + Scroll" to zoom in
In-Depth guide
I can recommend checking out the guide Collected Dust created here